I was in the mood to up-cycle some old clothes, and sweaters have so many possibilities. In my pile of too worn out, too small, too dated clothes, I found my husband's sweater that has shrunk. It was an XL, it looks more like a large now. The sleeves are perfect for making 18" doll clothes (American Girl). So, here's what you've been waiting for... the Sleeve Sweater Dress tutorial... Materials and Tools: A sweater: Mens large or bigger or a Woman's equivelant size A doll for fitting (This is designed for an 18" American doll) Scissors Pinking Shears (optional) Snap Sharpie Marker Thread Sewing Machine Ruler Pins Optional Materials (see Accessorize ) Cutting: First measure and cut about 12" up from the bottom of the sleeve (this will be the body of the dress). Next measure about 6" up from the remaining sleeve and cut again (the arms of the dress). None of these measurements are real exact for 2 reasons, 1) you're deali...


Soooo cute!!! Thank you for sharing this pattern - Melinda
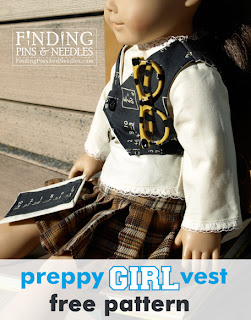
ReplyDeleteThank you for sharing that is a wonderful outfit too. Would love that top pattern too. Thank you June
ReplyDeleteVest is so cute, and so is the long-sleeved blouse with detail at sleeves and neckline. Would you share that pattern, too, please? Thank you!
ReplyDeleteI too would like to get your long sleeve top pattern
ReplyDeleteDawnD
i am having trouble flipping it what did I do wrong
ReplyDeleteDawn D
tddehnert@yahoo.com
I'd like to help, but you're going to have to be more specific...
DeleteWhen you put it together where did you start I did the top shoulder seams then the outer edges but when I tried turning I had a lot to go thru the little part of shoulder seams I know I must have done something wrong but not sure should I make each part separate then put together or what did I do wrong?
DeleteThanks for sharing.
ReplyDeleteHi there, Ive making the little vest & I've done the shoulders seams. Before I do the two layers & sew the circumference should I sew the side seams first? Help if you can. thanks
ReplyDeleteYes I am curious as to the side seams as well. There doesn't seem to be any instructions for sewing up the sides. Is the connection only made by the closure on the front of the vest? It is hard to tell from your pics if the sided are open or closed. Otherwise my vest turned out good.
ReplyDeleteThe instructions are not very clear. I usually sew the shoulder seams first on outer material. Then sew the shoulder seams on the lining. With right sides together, pin the outer material and lining together. Start sewing together (using a 1/4 " seam) from the V on one of the front sides. Continue stitching from the V up front, around neck and down other front until you get to the V on the other front. Next stitch around the arm openings. Turn vest by brining the front through the shoulders. Press.
ReplyDeleteTake one front side of the vest and pin it to the back side of the vest with right sides together. Stitch down side seams. (You will be stitching the outer material, right sides together, and lining material, right sides together all in one line of stitching). After you stitch both sides then you can fold the bottom edge up and stitch closed. Hope this helps!