
Cake decorating, no needles but it's crafty, right?
In the past few years I've dabbled in cake decorating. With 3 kids, 3 birthday cakes a year, and a number of showers in between I don't have a lot of experience, but wanted to share the one I whipped up last week because it was seriously fun to make.


Once the cake pop balls were cool, I placed whole and half balls in the cake pans and poured the cake batter (white and chocolate) over them. Bake. Surprisingly, they don't overcook being baked twice! So fun and I love the contrast of the red/white and red/chocolate! Thanks Once Upon a Pedestal and Snowy Bliss for the inspiration!

The cake topper was made using the Wilton Mini Ball Pan. I used one ball and covered it with fondant. The head of the ladybug is a ball of black fondant and the face was cut from scraps. I cut the eyes out using a round Wilton icing tip, super easy.

The red polkadots on the white layer believe it or not were cut out using a beer bottle. HA! It was the perfect size and gave the dots a nice rounded edge. Now that is being environmentally friendly... recycling, no... reusing. I'm so green.

The great flowers on the red layer are easy to make using PME Veined Sunflower, Gerbera & Daisy Cutters with fondant. I used the small one on the cake and the large cutter for the "1". I've used these cutters on three cakes now. I highly recommend them!


As I mentioned, my niece had a 1st birthday party and I was asked to make the cake with a ladybug theme. I did, but I surprised everyone by making the inside polka-dotted! Here's how it turned out...

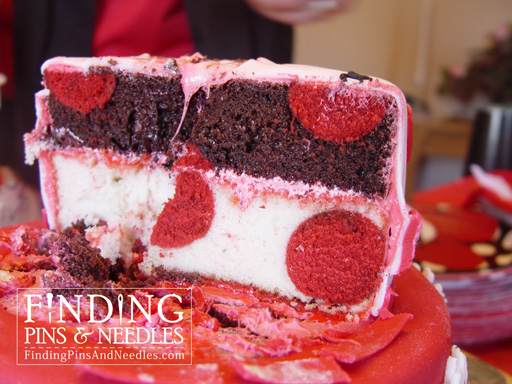
It's crazy how easy this polka-dot technique is. First, I used the red velvet cake recipe that came with my Babycakes Cake Pop Maker machine which I ordered from Amazon.
Once the cake pop balls were cool, I placed whole and half balls in the cake pans and poured the cake batter (white and chocolate) over them. Bake. Surprisingly, they don't overcook being baked twice! So fun and I love the contrast of the red/white and red/chocolate! Thanks Once Upon a Pedestal and Snowy Bliss for the inspiration!

The cake topper was made using the Wilton Mini Ball Pan. I used one ball and covered it with fondant. The head of the ladybug is a ball of black fondant and the face was cut from scraps. I cut the eyes out using a round Wilton icing tip, super easy.

The red polkadots on the white layer believe it or not were cut out using a beer bottle. HA! It was the perfect size and gave the dots a nice rounded edge. Now that is being environmentally friendly... recycling, no... reusing. I'm so green.

Cake Decorating Supplies
- Wilton Red Fondant
- Wilton White Fondant
- Ladybug sugar decorations from Hobby Lobby
- Babycakes Cake Pop Maker
- Wilton Mini Ball Pan (for the ladybug body on cake top)
- Fondant Smoother
- PME Veined Sunflower, Gerbera & Daisy Cutter
- Fondant Mat (tape it down with masking tape)
- Buttercream frosting
- And other misc. baking supplies (like pans, and CAKE)

Great job and very creative use of a beer bottle! Happy Caking!
ReplyDelete